
Coding With ChatGPT - Week 2: Styling, Images And a Sprinkle Of Javascript
Welcome to Week Two of Coding with ChatGPT
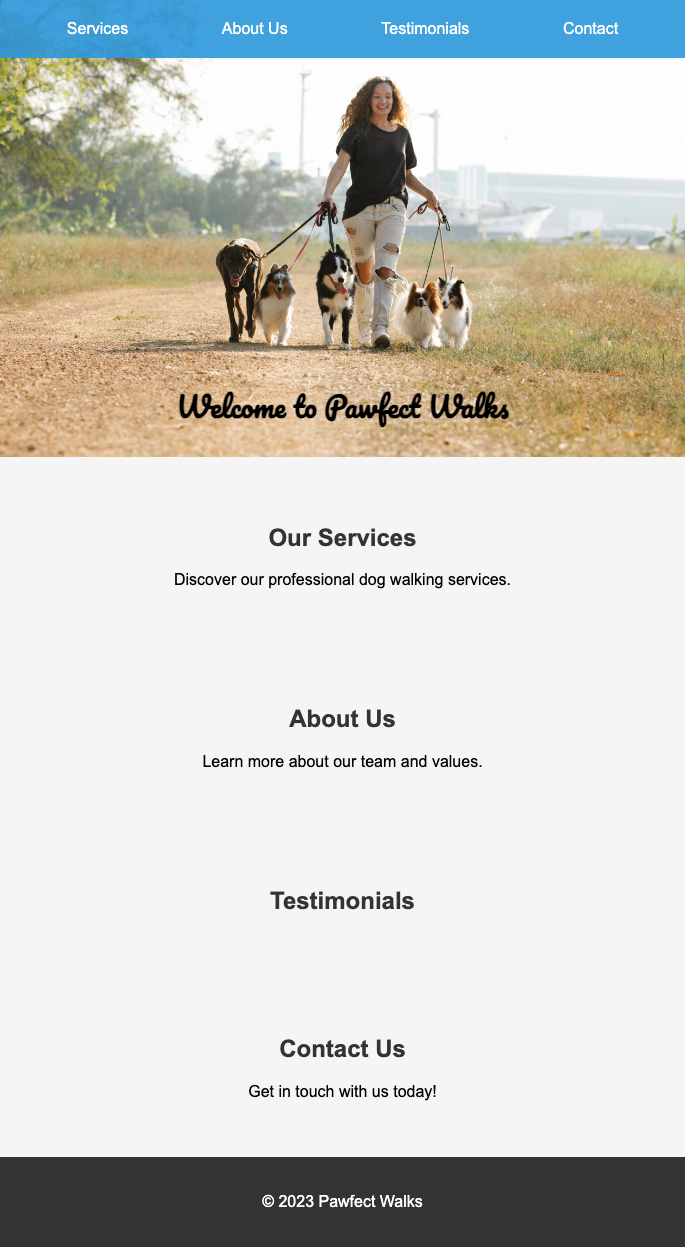
We will be following the same process as last time by sharing the link to the full conversation with ChatGPT that will hopefully create (by the end of this session) the below:
Here’s the link: View Conversation. Read this article in conjunction with the ChatGPT conversation, taking note of the conversation style, how I dig deeper, and get ChatGPT to do the legwork. Over time, you will have to ask fewer questions, and you’ll be able to do some of the more basic coding yourself. It’s a fantastic way to introduce yourself to the coding world, building and learning at the same time.
Let’s Begin
So if you followed Week 1, you should be set up with your chosen coding environment (we went with VSCode). Using that knowledge, set yourself up with a new project folder and open it within VSCode. Add your first index.html file and style.css stylesheet. (Missed Week 1 or need a reminder? Find it here.)
For Week 2, I’m using a fictitious client, a dog walker who wants a website to help her promote her growing dog walking business. Currently, she just has a Facebook page and wants to take it to the next level. I begin the conversation letting ChatGPT know my project or idea for a website. It reeled off some good insights about how to approach it, but we already know we want ChatGPT to do it for us.
I used this top-level overview ChatGPT produced to say, "Ok, based on all that you’ve said (which included the content, structure, etc.), show me an example of the HTML."
If you notice, I specifically said, "Excellent, based on what you've said, please show me the code, this is an extremely important project for me."
Side note: Research has shown that adding importance or a degree of urgency (by saying it’s an important project) into your prompts can achieve more accurate results (Cheng Li et al, EmotionPrompt: Leveraging Psychology for Large Language Models Enhancement via Emotional Stimulus, arXiv (2023) - see my blog post on that here.)
From this request, we get our first piece of HTML and CSS which we copy and paste into the index.html and styles.css. It gives us the basic structure of our website, which consists of a header section with the opening title of the website and a couple of sections, finishing with a footer.

So, let's start styling and improving, beginning with the header section. My next prompt was, "Can we have the 'Welcome to Pawfect Walks' in a fun, almost painted-style font?" ChatGPT responds with some information around Google Fonts, even providing the link: Browse Fonts - Google Fonts. Give this section of the chat a good read as it’s a lesson on how to import and use different fonts.
It also came back with the HTML, but it was a template and didn’t actually choose a font for me:
<link rel="stylesheet" href="https://fonts.googleapis.com/css2?family=Your+Selected+Font">
All I did to rectify was to re-prompt, but this time a more direct approach: "Can you choose one for me you think fits my description?" It complies and chooses a fun painted-like font for me. I followed the instructions by copying and pasting the code it provided into the <head> section of my HTML like so:

Added the CSS into the styles.css file:

And it produced a new font for our header. Looking a little better already!

Ok, so we have our updated, fun font. How do we add an image to this top section? You see websites with images in the header section all the time, and I feel that will make it look so much better. My prompt is straightforward and continues in this conversational style: "How do I add an image? I want it in the header." (Note, it’s important to clarify to ChatGPT which section you are referring to, the section where we added the font to is called <header>, so make sure you are telling ChatGPT specifically which section of code you are talking about.)
It then discusses how to add an image, but straight away it talks about uploading an image to my web server. But I’m using VSCode on my computer; this isn’t a hosted website just yet, so I clarify that I’m using VSCode on my computer, and it re-adjusts its response for me to better suit my situation. It explains that you need to create a new folder by clicking the little folder icon within your VSCode folder called "images" and to place your image you want in there.

For my image, I went with a woman walking a dog. This isn’t an AI-generated image, and this is an important point to make. You will need to ensure that you can use AI-generated images for commercial reasons, as not all AI text-to-image models will legally allow you to, so check the terms and conditions. I got mine from a royalty-free image site such as Unsplash or Pixabay.
So I saved my image into the folder as it suggested and copied and pasted the code it gave me:
<header>
    <img src="images/my-header-image.jpg" alt="Pawfect Walks Logo" />
    <h1>Welcome to Pawfect Walks</h1>
</header>
As long as you’ve created a folder called "images," then you just need to update the placeholder name it has provided ("my-header-image.jpg") and it will work. (I named mine "hero.jpg")
<header>
    <img src="images/hero.jpg" alt="Pawfect Walks Logo" />
    <h1>Welcome to Pawfect Walks</h1>
</header>
I went to take a look at what it now looked like and got a bit of a shock!

The size of the image was huge! I quickly went back to ChatGPT to update it on what had happened by stating, "The image is huge, how do I contain it to just that section" (remember, I just wanted it to cover that <header> section).
It gave me some advice and importantly the HTML to just copy and paste (it added a class name to allow us to pinpoint the styling):
<header class="header-section">
    <img src="images/my-header-image.jpg" alt="Pawfect Walks Logo" />
    <h1>Welcome to Pawfect Walks</h1>
</header>
And then it gave us the CSS to style it (remember to re-change the name of the placeholder image file name as it didn’t know the name of my image was "hero.jpg," so when it came back to repeating the same code, it didn’t use my image name).
It still didn’t come out exactly how I wanted it.

So I went back again, this time with more detail: "I can see the blue background above and below the image, I just want the image to cover all of that section, and I want the writing 'Welcome to Pawfect Walks' to go on top of the image nicely. Here is my CSS [I then copied in from VSCode all of my CSS]."
It provided me with the new CSS, and I simply copied and pasted the code into my VSCode styles.css file. I iterated a few more times, asking how I can move it myself (it said to adjust the bottom value’s %). The lower the %, the closer to the bottom of the image it would go.

What I love about the code that it gives you is it adds anecdotes to the code so you can see what each element does, and you can play around adjusting them yourself.
Time to add a navigation bar… I wanted something a little fancy, so I prompted: "Can you add an ever so slightly see-through navigation bar at the top, and when you click it, smoothly scrolls to the appropriate section?"
Notice how I'm now asking ChatGPT to add things to my code. You don’t need to copy and paste your whole code back in, and at this point, it can remember the code as we haven’t breached the token limit.
It instantly replies with the HTML, CSS, and the JavaScript we will need to add this navigation bar to our website.
HTML

CSS

Javascript

We know what to do with HTML and we know where the CSS styling goes, but we’ve never dealt with JavaScript before, which is for handling cool things like movement, sliding images, and loads of stuff. So I asked it where do I put the JavaScript. It explained that you put it just before the closing </body> tag.
I then quickly asked it to make the navbar a little thicker, as it was too thin. After those iterations, this is what we have.
We are going to leave it there for Week 2, and we will carry on building this project into Week 3.
Without even knowing it, this week we’ve started a new project, learnt how to change fonts by importing them from Google Fonts, find royalty-free images, add images onto our website, overlay text on top of images and position the text. Not only that, we’ve also added our first snippet of JavaScript, understood what it’s for and ultimately added a semi-transparent floating navigation bar that scrolls when you click the link using JavaScript.
Not bad for someone who can’t code! I really hope you followed along and enjoyed this week's Coding with ChatGPT session. Next week we will continue with this dog walking business by beefing out the website's copy (content), adding a way for customers to get in touch via a form, and more.