The original Coding With ChatGPT series worked because it started from zero. This refresh keeps that same idea, but the tools have moved on. ChatGPT is stronger at explaining code, VS Code is still the easiest beginner editor, ChatGPT Projects are useful once we have multiple files, and Codex becomes worth introducing once the project has enough moving parts.
For Week 1, we are staying deliberately simple. No framework. No command line. No database. No hosting yet. We are going to start in a normal ChatGPT session, create two files, preview them in a browser, and understand the basic loop: ask, paste, save, preview, debug, improve.
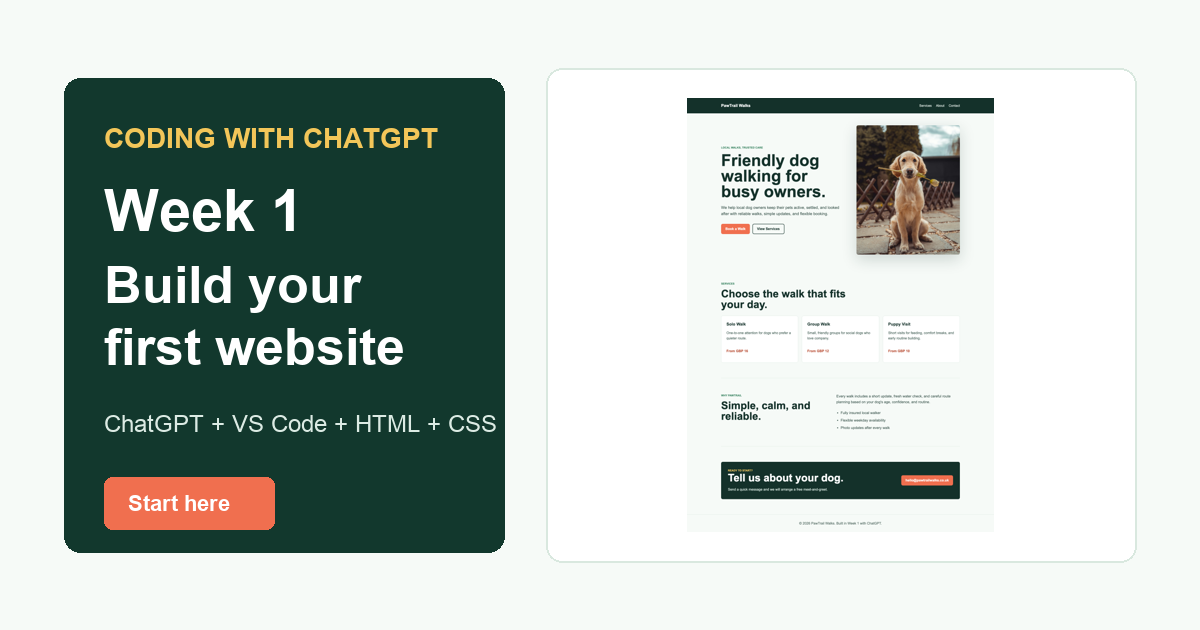
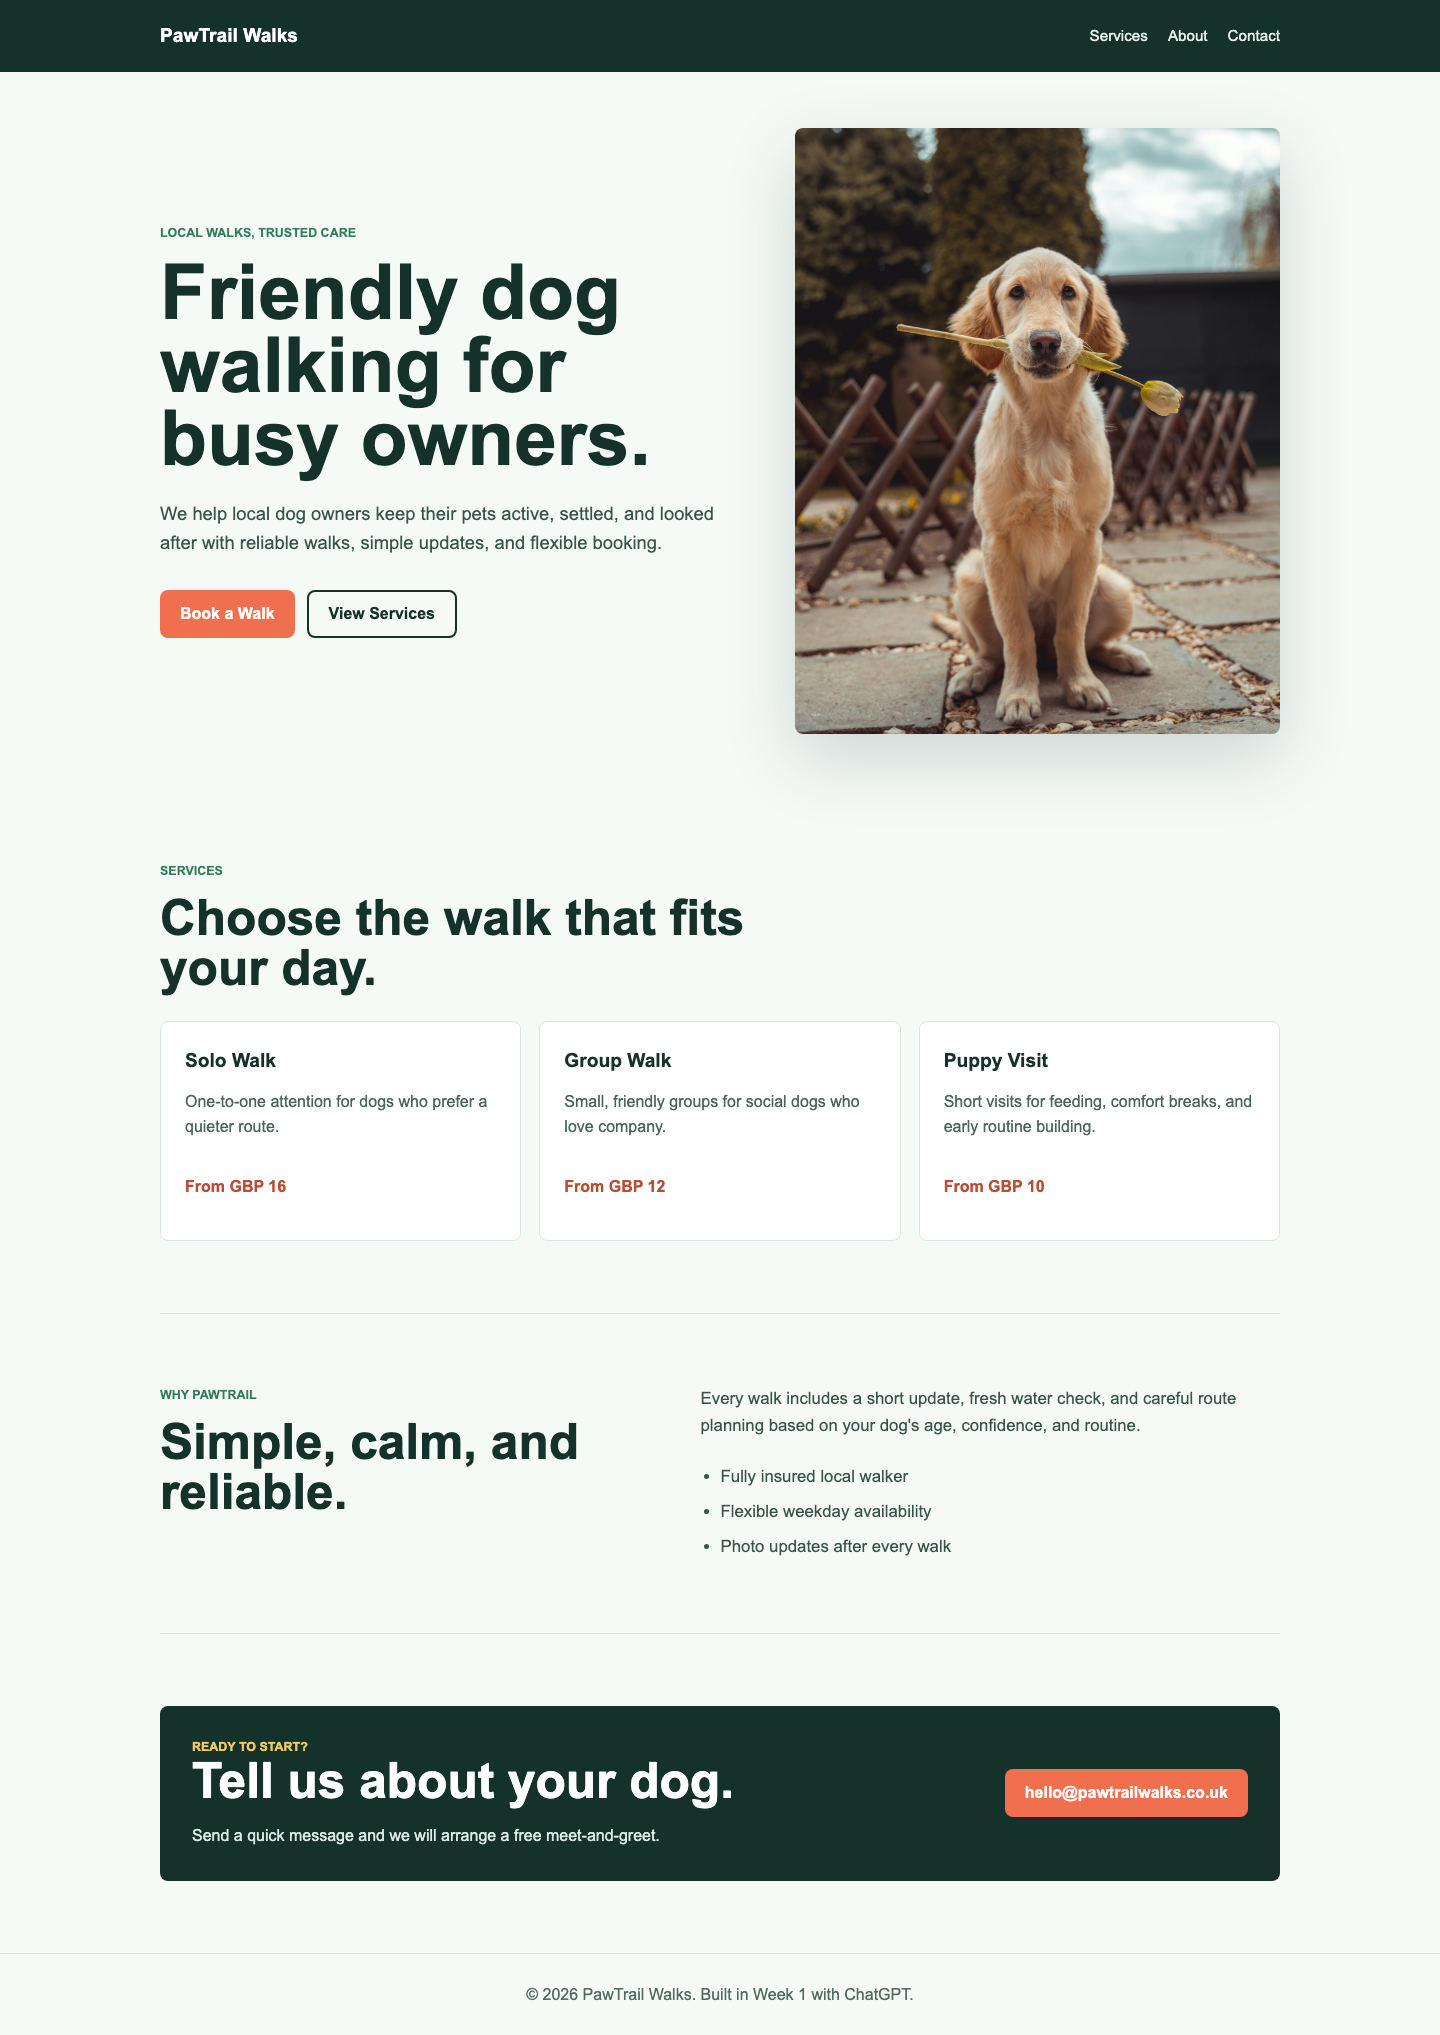
What we are building: a one-page website for a fictional local dog walking business called PawTrail Walks. It gives us room to add proper features later: service cards, a booking enquiry form, JavaScript pricing, PHP form handling, and deployment to Hostinger.
Table of Contents
- Start a clean ChatGPT session
- Install VS Code and Live Server
- Create your first HTML file
- Preview plain HTML
- Add CSS and make it look like a website
- Use ChatGPT properly when something breaks
- Where the series goes next
Step 1: Start A Clean ChatGPT Session
Open ChatGPT in your browser and start a new chat. Do not begin with “make me a website.” That usually gives you a big block of code with no learning. Instead, set the role, the rules, and the project scope.
Prompt to paste into ChatGPT:
I want to learn web development by building a real small business website.

Act as a patient web development tutor.

Rules:
- Explain what you are doing in plain English.
- Keep Week 1 to HTML and CSS only.
- Do not use a framework.
- Give me code I can copy into VS Code.
- If I paste an error or screenshot, help me debug it step by step.

Project:
We are building a one-page website for a local dog walking business called PawTrail Walks.
The important thing here is that you are telling ChatGPT to teach, not just generate. That changes the output. It should explain the code, stay inside beginner boundaries, and help you debug instead of rushing ahead.
Step 2: Install VS Code And Live Server
VS Code is still the easiest recommendation for this project. It is free, widely used, and friendly enough for a first HTML and CSS build.
Download VS Code from code.visualstudio.com. Then open the Extensions panel and install Live Server. Live Server lets you right-click your HTML file and open a local browser preview that refreshes when you save.
Step 3: Create The Project Files
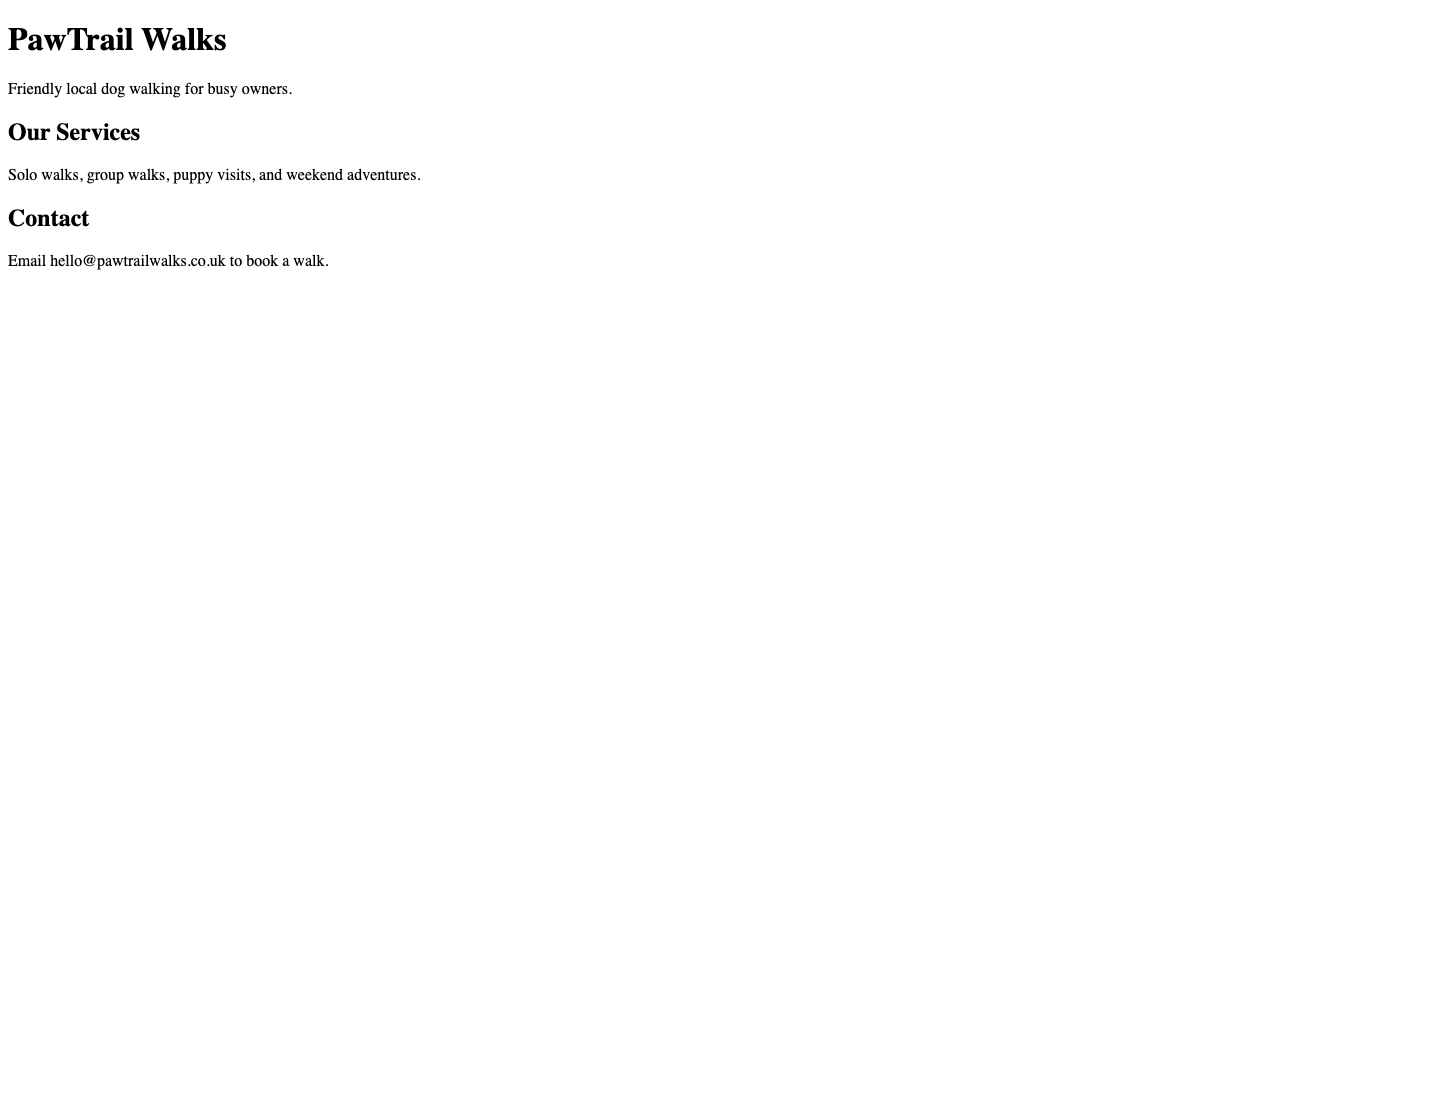
Create a folder called PawTrail Walks. Open that folder in VS Code. Inside it, create a file called index.html. This is the main page file most websites look for first.
Paste this into index.html. It is intentionally basic. The goal is to prove that the file opens in a browser before we add design.
<!DOCTYPE html>
<html lang="en">
<head>
    <meta charset="UTF-8">
    <meta name="viewport" content="width=device-width, initial-scale=1.0">
    <title>PawTrail Walks</title>
</head>
<body>
    <h1>PawTrail Walks</h1>
    <p>Friendly local dog walking for busy owners.</p>

    <h2>Our Services</h2>
    <p>Solo walks, group walks, puppy visits, and weekend adventures.</p>

    <h2>Contact</h2>
    <p>Email hello@pawtrailwalks.co.uk to book a walk.</p>
</body>
</html>
Step 4: Preview The Plain HTML
Right-click index.html in VS Code and choose Open with Live Server. Your browser should show plain text with default browser styling.
Now paste the code back into ChatGPT and ask it to explain it. This is how you avoid becoming a copy-and-paste passenger.
Prompt to paste into ChatGPT:
Here is my first index.html file. Explain what each part does in beginner language.

After that, tell me what we need to add next to make it look like a real small business website, but keep it to HTML and CSS only.
Step 5: Add CSS And Turn It Into A Website
Create a second file called styles.css. Then update the <head> section of index.html so it links to that CSS file:
<link rel="stylesheet" href="styles.css">For this version, we also use an image. On this site, the image lives in the main /images/ folder, so the image path in the HTML is:
<img src="images/coding-with-chatgpt-week-1-dog-walker-hero.jpg" alt="A happy dog wearing a harness outdoors">If you are building the project locally in a separate folder, you can either create an images folder inside your project or change the path to match where you saved your image.
Finished Week 1 HTML
<!DOCTYPE html>
<html lang="en">
<head>
<meta charset="UTF-8">
<meta name="viewport" content="width=device-width, initial-scale=1.0">
<title>PawTrail Walks | Local Dog Walking</title>
<meta name="description" content="PawTrail Walks is a friendly local dog walking service offering solo walks, group walks, puppy visits, and weekend adventures.">
<link rel="stylesheet" href="styles.css">
</head>
<body>
<header class="site-header">
<nav class="nav" aria-label="Main navigation">
<a class="logo" href="#top">PawTrail Walks</a>
<div class="nav-links">
<a href="#services">Services</a>
<a href="#about">About</a>
<a href="#contact">Contact</a>
</div>
</nav>
</header>
<main id="top">
<section class="hero">
<div class="hero-content">
<p class="eyebrow">Local walks, trusted care</p>
<h1>Friendly dog walking for busy owners.</h1>
<p class="hero-text">We help local dog owners keep their pets active, settled, and looked after with reliable walks, simple updates, and flexible booking.</p>
<div class="hero-actions">
<a class="button primary" href="#contact">Book a Walk</a>
<a class="button secondary" href="#services">View Services</a>
</div>
</div>
<img src="images/coding-with-chatgpt-week-1-dog-walker-hero.jpg" alt="A happy dog wearing a harness outdoors">
</section>
<section class="section" id="services">
<div class="section-heading">
<p class="eyebrow">Services</p>
<h2>Choose the walk that fits your day.</h2>
</div>
<div class="service-grid">
<article class="service-card">
<h3>Solo Walk</h3>
<p>One-to-one attention for dogs who prefer a quieter route.</p>
<strong>From GBP 16</strong>
</article>
<article class="service-card">
<h3>Group Walk</h3>
<p>Small, friendly groups for social dogs who love company.</p>
<strong>From GBP 12</strong>
</article>
<article class="service-card">
<h3>Puppy Visit</h3>
<p>Short visits for feeding, comfort breaks, and early routine building.</p>
<strong>From GBP 10</strong>
</article>
</div>
</section>
<section class="split-section" id="about">
<div>
<p class="eyebrow">Why PawTrail</p>
<h2>Simple, calm, and reliable.</h2>
</div>
<div class="about-copy">
<p>Every walk includes a short update, fresh water check, and careful route planning based on your dog's age, confidence, and routine.</p>
<ul>
<li>Fully insured local walker</li>
<li>Flexible weekday availability</li>
<li>Photo updates after every walk</li>
</ul>
</div>
</section>
<section class="contact-panel" id="contact">
<div>
<p class="eyebrow">Ready to start?</p>
<h2>Tell us about your dog.</h2>
<p>Send a quick message and we will arrange a free meet-and-greet.</p>
</div>
<a class="button primary" href="mailto:hello@pawtrailwalks.co.uk">hello@pawtrailwalks.co.uk</a>
</section>
</main>
<footer class="site-footer">
<p>© 2026 PawTrail Walks. Built in Week 1 with ChatGPT.</p>
</footer>
</body>
</html>Finished Week 1 CSS
* {
    box-sizing: border-box;
}

html {
    scroll-behavior: smooth;
}

body {
    margin: 0;
    font-family: Arial, Helvetica, sans-serif;
    color: #14312a;
    background: #f6faf7;
    line-height: 1.6;
}

a {
    color: inherit;
}

.site-header {
    background: #14312a;
    color: #ffffff;
}

.nav {
    width: min(1120px, calc(100% - 32px));
    margin: 0 auto;
    min-height: 72px;
    display: flex;
    align-items: center;
    justify-content: space-between;
    gap: 24px;
}

.logo {
    font-weight: 800;
    text-decoration: none;
    font-size: 1.2rem;
}

.nav-links {
    display: flex;
    align-items: center;
    gap: 20px;
}

.nav-links a {
    color: #e8f2ec;
    text-decoration: none;
}

main {
    width: min(1120px, calc(100% - 32px));
    margin: 0 auto;
}

.hero {
    min-height: 620px;
    display: grid;
    grid-template-columns: minmax(0, 1fr) minmax(340px, 0.82fr);
    gap: 44px;
    align-items: center;
    padding: 56px 0;
}

.eyebrow {
    margin: 0 0 12px;
    color: #2f7d59;
    font-weight: 800;
    text-transform: uppercase;
    font-size: 0.78rem;
}

h1 {
    font-size: clamp(2.5rem, 6vw, 4.8rem);
    line-height: 0.95;
    margin: 0 0 24px;
}

h2 {
    font-size: clamp(2rem, 4vw, 3.1rem);
    line-height: 1;
}

.hero-text {
    font-size: 1.15rem;
    color: #38534b;
}

.hero img {
    width: 100%;
    aspect-ratio: 4 / 5;
    object-fit: cover;
    border-radius: 8px;
    box-shadow: 0 24px 70px rgba(20, 49, 42, 0.18);
}

.hero-actions {
    display: flex;
    flex-wrap: wrap;
    gap: 12px;
    margin-top: 32px;
}

.button {
    display: inline-flex;
    align-items: center;
    justify-content: center;
    min-height: 48px;
    padding: 0 20px;
    border-radius: 8px;
    text-decoration: none;
    font-weight: 800;
}

.button.primary {
    background: #f06f4f;
    color: #ffffff;
}

.button.secondary {
    border: 2px solid #14312a;
    color: #14312a;
}

.section {
    padding: 72px 0;
}

.service-grid {
    display: grid;
    grid-template-columns: repeat(3, minmax(0, 1fr));
    gap: 18px;
}

.service-card {
    background: #ffffff;
    border: 1px solid #d9e8df;
    border-radius: 8px;
    padding: 24px;
    min-height: 220px;
}

.service-card strong {
    color: #b84e35;
}

.split-section {
    border-top: 1px solid #d9e8df;
    border-bottom: 1px solid #d9e8df;
    padding: 72px 0;
    display: grid;
    grid-template-columns: 0.85fr 1fr;
    gap: 48px;
}

.contact-panel {
    margin: 72px 0;
    padding: 32px;
    background: #14312a;
    color: #ffffff;
    border-radius: 8px;
    display: flex;
    align-items: center;
    justify-content: space-between;
    gap: 24px;
}

.site-footer {
    padding: 28px 16px;
    text-align: center;
    color: #526a62;
    border-top: 1px solid #d9e8df;
}

@media (max-width: 820px) {
    .nav,
    .contact-panel {
        align-items: flex-start;
        flex-direction: column;
    }

    .hero,
    .split-section {
        grid-template-columns: 1fr;
    }

    .service-grid {
        grid-template-columns: 1fr;
    }
}
Save both files. If Live Server is running, the browser should refresh. If it does not, refresh the page manually.

Step 6: Use ChatGPT Properly When Something Breaks
Something will go wrong eventually. A missing quote, the wrong file name, a CSS typo, or an image saved in the wrong folder. That is not failure. That is the work.
Debugging prompt:
My website is not showing the CSS.

Here are my files:
- index.html
- styles.css

Here is the link tag from my HTML:
[paste the line here]

Ask me one question at a time and help me debug this like a beginner.
Do not just say “fix it.” Give ChatGPT the file names, what you expected, what happened instead, and the exact code that seems relevant. The better the debugging context, the better the answer.
Common Week 1 Problems
- The CSS does not appear: check that the file is called
styles.cssand the HTML sayshref="styles.css". - The image does not load: check that the image path matches where the image is actually saved.
- Live Server is missing: install the Live Server extension in VS Code and right-click
index.htmlagain. - The layout looks different: save both files after pasting the code.
- The page opens as text: make sure the file ends in
.html, not.txt.
Where This Series Goes Next
The project is small today because the learning loop matters more than the finished design. The plan is to keep building on the same website until it becomes a useful small business site.
Week 2: polish the homepage
Improve the copy, colour choices, service sections, buttons, and spacing. We will also intentionally break something and debug it with ChatGPT.
Week 3: move into ChatGPT Projects
Once we have multiple files and repeated instructions, Projects become useful for keeping the build organised.
Week 4: add JavaScript
Add interaction such as a price estimator, FAQ accordion, service selector, and basic form validation.
Week 5: introduce Codex and hosting
Use Codex when the project has enough files to justify an agent, then prepare PHP form handling and start discussing Hostinger deployment.
Your Week 1 Homework
Before moving to Week 2, change the business name, headline, service prices, service descriptions, and contact email. Then ask ChatGPT to explain every line you changed.
Review prompt:
I changed the Week 1 website.

Here is my updated HTML and CSS.

Please review it as a beginner project:
- Tell me if anything is broken.
- Explain any CSS I probably do not understand yet.
- Suggest three simple improvements for Week 2, but do not rewrite the whole site.
Sources And Screenshot References
- Visual Studio Code official site
- OpenAI Academy: getting started with ChatGPT
- OpenAI Help: ChatGPT Projects
- OpenAI Codex product page
- Unsplash for the dog image used in the starter project preview.
