Beginner to Intermediate

AI Agent Skills Masterclass: Create, Install & Use SKILL.md Files

Master reusable AI agent skills across Claude Code, Codex, OpenClaw, and 30+ platforms

3 hours
5 Modules
Updated April 1, 2026
Stephen AI
Instructor: Stephen AI
Founder of The Prompt Index with extensive experience in AI agent skills and agentic coding workflows.
AI Agent Skills Masterclass - SKILL.md Guide 2026

Course Overview

AI agent skills are changing how developers work with coding assistants. Instead of repeating the same instructions every session, you write them once in a SKILL.md file and your agent knows exactly what to do. This free masterclass covers everything: what skills are, how they work across Claude Code, Codex, and OpenClaw, how to write your own from scratch, and how to stay safe doing it. By the end, you will be able to create, install, share, and manage AI agent skills on any compatible platform.

Requirements

  • Basic familiarity with a code editor or terminal
  • Understanding of YAML and Markdown syntax (helpful but not required)
  • Access to at least one AI coding assistant (Claude Code, Codex, or similar)
  • No programming experience required for core concepts

What You'll Learn

  • Understand what AI agent skills are and how progressive disclosure works
  • Write SKILL.md files with proper frontmatter and instruction bodies
  • Create and deploy skills on Claude Code, Codex, and OpenClaw
  • Build real-world skills with scripts, references, and validation gates
  • Install and share community skills via Git, registries, and zip bundles
  • Apply security best practices to protect against malicious skills

Course Content

Learn what AI agent skills are, why they matter, and how progressive disclosure keeps your context window lean.

Lessons in this module:

  • What Are AI Agent Skills?
  • Skills vs. System Prompts vs. Tools
  • How Progressive Disclosure Works
  • The Skill Lifecycle: Catalog, Activate, Execute

Module Content:

What Are AI Agent Skills?

If you've ever found yourself pasting the same long instructions into ChatGPT, Claude, or Codex at the start of every session—explaining your project's conventions, how to run tests, or how deployments work—skills solve that problem permanently.

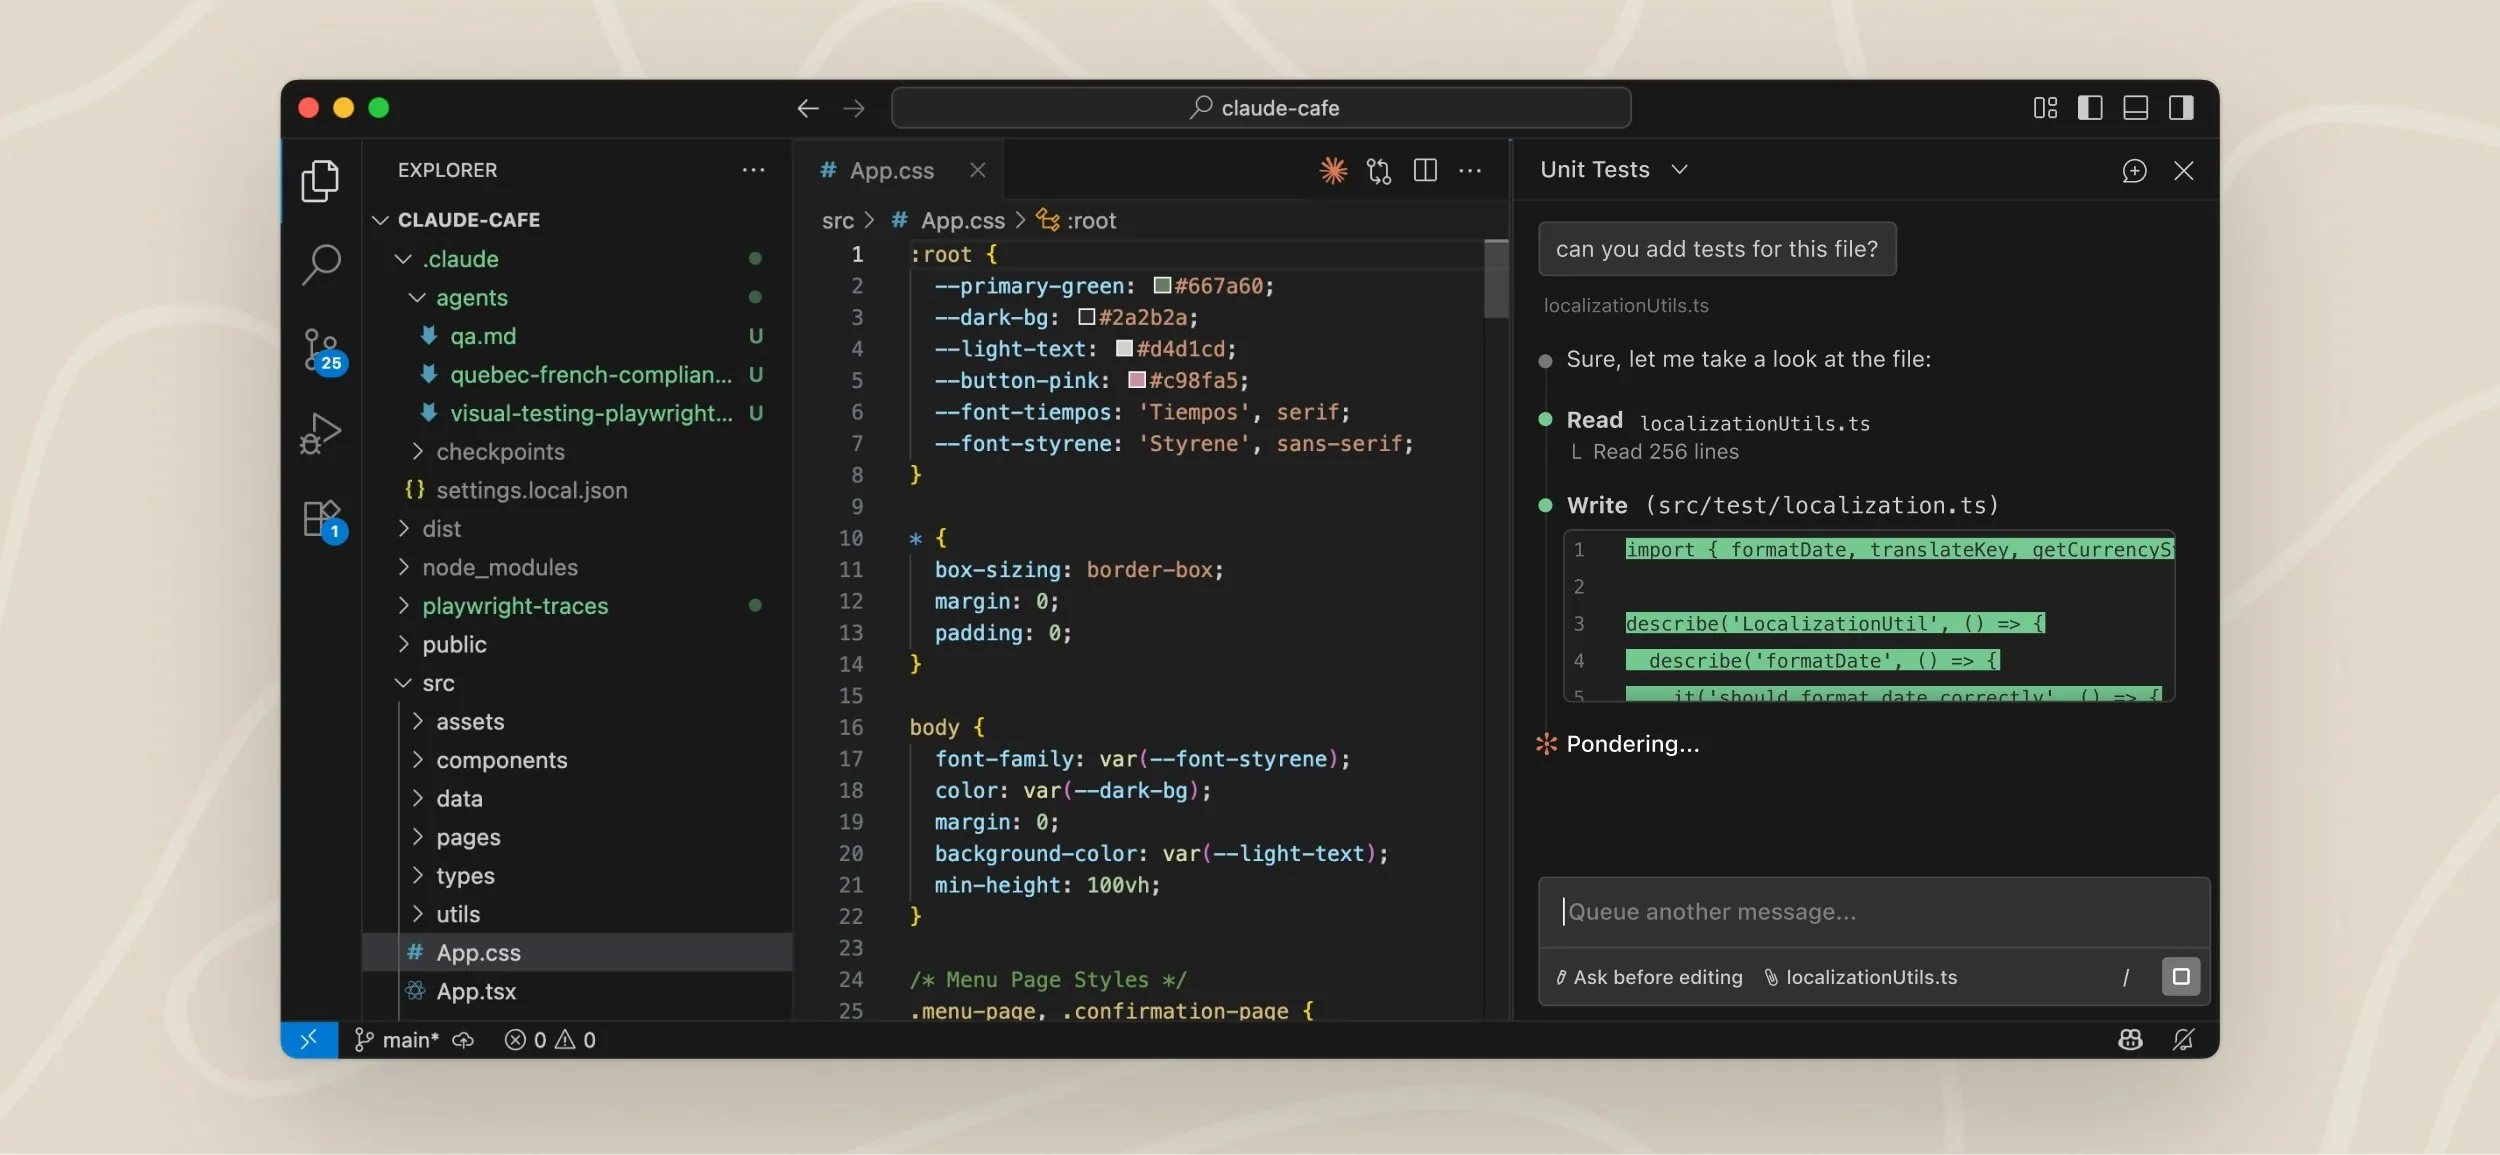
An AI agent skill is a reusable instruction bundle that teaches an AI coding assistant a specific procedure. Think of it as a recipe card for your agent: it describes when to activate, what to do, and how to do it. The skill lives in a folder in your project or on your system, and the agent loads it automatically when it's relevant.

At its core, a skill is a folder whose centerpiece is a SKILL.md file. That file contains two parts:

  • YAML frontmatter with metadata (name, description) used for discovery and routing
  • A Markdown body with step-by-step instructions the agent follows when the skill activates

The folder can also include scripts/, references/, and assets/ directories with supporting files the agent can read or execute on demand.

Skills vs. System Prompts vs. Tools

It's important to understand where skills fit in the AI agent ecosystem:

  • System prompts set global constraints and personality for the entire session.
  • Tools perform side effects like file I/O, API calls, and shell commands.
  • Skills package repeatable procedures plus scripts and assets so they can be versioned, shared, and reused independently—like functions for your AI assistant.

How Progressive Disclosure Works

Skills don't dump their entire contents into the AI's context window from the start. That would waste tokens and slow things down. Instead, every major platform uses a three-tier progressive disclosure model:

  1. Catalog disclosure: At session start, the agent sees only each skill's name and description—a compact list that costs minimal tokens. This is enough for the agent to know what's available.
  2. Activation: When the agent determines a skill is relevant (either because you triggered it or because the task matches the description), it loads the full SKILL.md body into context.
  3. Resource loading: Scripts, reference documents, and assets are loaded on-demand only when the instructions reference them—not preemptively.

This design keeps context lean. A project with 20 installed skills might only pay the token cost for 1–2 of them in any given session.

Master the anatomy of a SKILL.md file, from required frontmatter fields to writing effective instruction bodies.

Lessons in this module:

  • Anatomy of a SKILL.md File
  • Required Frontmatter: Name & Description
  • Optional Frontmatter Fields
  • Writing the Instruction Body
  • Skill Folder Structure: Scripts, References & Assets

Module Content:

Anatomy of a SKILL.md File

The SKILL.md file is the manifest that makes everything work. It combines YAML frontmatter with Markdown instructions to create a complete skill definition:

---
name: deploy-staging
description: Deploy the current branch to the staging environment.
  Use when the user asks to "deploy to staging", "push to stage",
  or "test in staging".
license: MIT
compatibility: Requires docker and kubectl. Network access required.
---

# Deploy to Staging

## When to use this skill
Use when the user wants to deploy their current branch to staging.
Trigger phrases: "deploy to staging", "push to stage", "ship it to test"

## Steps
1. Verify the working tree is clean (no uncommitted changes).
2. Run the test suite: `npm test`
3. Build the Docker image: `docker build -t app:staging .`
4. Push and deploy: `kubectl apply -f k8s/staging/`
5. Verify the deployment is healthy.

## Safety
- Never deploy with failing tests.
- Always confirm with the user before the kubectl apply step.

Required Frontmatter Fields

  • name (required): 1–64 characters, kebab-case (a-z, numbers, hyphens). Must match the parent directory name. No consecutive hyphens.
  • description (required): 1–1,024 characters. Explains what the skill does and when to use it. This is the routing signal—make it keyword-rich.
The description field is the single most important thing you write. It drives both automatic activation and discovery. Include the actual phrases your team uses—"deploy to staging", "push to prod", "run the migration"—not just technical descriptions.

Optional Frontmatter Fields

  • license: License identifier (e.g., MIT, Apache-2.0).
  • compatibility: Runtime requirements (binaries, network, OS).
  • metadata: Additional key-value pairs for platform-specific properties.
  • allowed-tools (experimental): Space-delimited allowlist of tools the skill may use.

Skill Folder Structure

A complete skill folder follows this structure:

run-tests/
  SKILL.md                  # Main manifest
  scripts/
    run_tests.sh            # Helper script
  references/
    test-conventions.md     # Project test patterns
  assets/
    config-template.yaml    # Templates, samples

Scripts should be non-interactive, accept command-line arguments, include a --help flag, output structured data (JSON) where possible, and return meaningful exit codes.

Explore how skills work on each major platform, including directory conventions, invocation methods, and platform-specific extensions.

Lessons in this module:

  • Claude Code Skills: Scopes, Extended Frontmatter & Built-in Skills
  • OpenAI Codex Skills: Directory Scanning & Sidecar Metadata
  • OpenClaw Skills: Load-Time Gating & ClawHub Registry
  • Claude Web: Built-in Agent Skills & Projects
  • Platform Comparison: Which One Should You Use?

Module Content:

Claude Code Skills

Claude Code is Anthropic's terminal-based AI coding agent and has the most feature-rich skill implementation of any platform. Skills live in your project's .claude/skills/ directory or the user-level ~/.claude/skills/ directory.

Skill Scopes:

ScopePathWho It Applies To
EnterpriseManaged settingsAll organization users
Personal~/.claude/skills/<name>/SKILL.mdYou, across all projects
Project.claude/skills/<name>/SKILL.mdAnyone working in this repo
Plugin<plugin>/skills/<name>/SKILL.mdWhere the plugin is enabled

Extended Frontmatter (Claude Code-specific):

---
name: my-skill
description: What this skill does and when to use it
argument-hint: "[issue-number]"          # Shown in autocomplete
disable-model-invocation: true           # Only user can trigger
user-invocable: false                    # Only Claude can trigger
allowed-tools: Read, Grep, Glob          # Pre-approved tools
model: claude-opus-4-6                   # Override model
context: fork                            # Run in isolated subagent
agent: Explore                           # Subagent type
---

Claude Code also ships with built-in skills like /batch, /claude-api, /debug, /loop, and /simplify.

OpenAI Codex Skills

Codex uses the .agents/skills/ directory convention and supports both implicit and explicit skill invocation:

  • Implicit invocation: Codex reads the description and automatically activates the skill when it detects a matching task
  • Explicit invocation: Users type $skill-name to force-activate a specific skill
  • Directory scanning: Codex walks up the directory tree from your working directory to the repo root, scanning every .agents/skills/
  • Sidecar metadata: An optional agents/openai.yaml file can declare UI display names, invocation policies, and MCP tool dependencies

OpenClaw Skills

OpenClaw is an open-source AI agent with several unique capabilities:

  • Load-time gating: Skills declare prerequisites (required binaries, environment variables, OS, config values). Skills that don't pass the gate aren't shown to the model.
  • ClawHub registry: A public skill registry where you can browse, install, and publish skills. Think npm for AI agent skills.
  • Three-source precedence: Bundled skills → managed skills (~/.openclaw/skills) → workspace skills.
  • Environment injection: OpenClaw can inject API keys for the duration of a skill's execution, then restore the original environment.

Claude Web (claude.ai)

Claude's web interface has two separate skill-like systems:

  • Built-in Agent Skills: Pre-built skills for PowerPoint, Excel, Word, and PDF creation that activate automatically.
  • Custom Skills: Pro/Max/Team/Enterprise users can upload custom skills as zip files via Settings > Features.
  • Projects: Provide persistent instructions and knowledge files across conversations (context, not capabilities).

Platform Comparison

Feature Claude Code Codex OpenClaw Claude Web
Skill directory .claude/skills/ .agents/skills/ ~/.openclaw/skills/ Settings > Features
Auto-trigger Yes Yes Yes (with gating) Yes (built-in)
Slash commands /skill-name $skill-name Configurable No
Script bundling Yes Yes Yes Yes (VM)
Public registry Community Built-in ClawHub No

Walk through building a skill from scratch, step by step. Then build a more advanced skill with scripts, validation gates, and reference templates.

Lessons in this module:

  • Step 1: Create the Skill Directory
  • Step 2: Write the SKILL.md File
  • Step 3: Add Supporting Files
  • Step 4: Test Implicit & Explicit Invocation
  • Real-World Example: CSV Analyzer Skill

Module Content:

Step 1: Create the Skill Directory

Make a folder for your skill. The folder name should match the skill's name field:

# For Claude Code:
mkdir -p .claude/skills/run-tests

# For Codex:
mkdir -p .agents/skills/run-tests

# For OpenClaw:
mkdir -p ~/.openclaw/skills/run-tests

Step 2: Write the SKILL.md File

Create SKILL.md inside your skill folder with frontmatter and instructions:

---
name: run-tests
description: Run the project test suite and report results.
  Use when the user says "run tests", "check tests",
  or "are the tests passing".
---

# Run Tests

## When to use this skill
Use when the user asks to run, check, or verify tests.
Do NOT use when the user only asks about test coverage
or wants to write new tests.

## Steps
1. Check which test runner is configured
   (look for jest.config, vitest.config, pytest.ini, etc.)
2. Run the appropriate test command.
3. If tests fail, summarize which tests failed and why.
4. If all tests pass, confirm with a brief summary.

## Safety
- Never modify test files unless explicitly asked.
- If the test suite takes longer than 5 minutes,
  warn the user before running.

Step 3: Add Supporting Files (Optional)

If your skill needs scripts or reference docs, add them to subdirectories. Scripts should be designed for non-interactive use: accept all inputs as command-line arguments, include a --help flag, output structured data (JSON) where possible, return meaningful exit codes, and default to safe behavior.

Step 4: Test It

Start a new session with your agent and try triggering the skill:

  • Implicit: Just say "run the tests" and see if the agent activates your skill
  • Explicit: Use the platform's invocation syntax (/run-tests in Claude Code, $run-tests in Codex)

If the skill doesn't trigger, refine the description field—it's almost always a routing problem.

Real-World Example: CSV Analyzer Skill

Here's a more substantial skill that demonstrates multi-step workflows with validation gates:

---
name: csv-insights
description: Summarize CSV files into a markdown report
  with chart images. Use when the user mentions CSV analysis,
  cleaning, or summary reporting.
compatibility: Requires python3 and a writable working directory.
metadata:
  author: "data-platform"
  version: "1.2.0"
---

# CSV Insights

## When to use this skill
Use when the user asks for: "summarize this CSV",
"clean up this dataset", "make a chart from my spreadsheet",
"top N rows by metric".

Do NOT use when the user only wants a quick explanation
without processing files.

## Workflow
1. Validate input file exists and is a CSV.
   - If not, stop and ask for the correct path.
2. Run the analyzer script:
   python3 scripts/analyze_csv.py --input "CSV_PATH"
   --out "outputs/report.md"
3. Validate the report contains:
   - Dataset shape
   - Missingness summary
   - Top 5 rows preview
4. If charts were requested, ensure at least one image exists.
5. If validation fails, fix and re-run once.

## Gotchas
- If a CSV uses semicolons as delimiter, detect and pass --delimiter.
- If the file exceeds 100MB, sample rows and say you sampled.

This skill follows the "plan-validate-execute" pattern recommended by the Agent Skills specification. The agent won't blindly run the script—it validates inputs first, checks outputs after, and has a clear error-handling path.

Learn how to install community skills, share your own, understand the Agent Skills open specification, and protect against malicious skills.

Lessons in this module:

  • Sharing Skills via Git & User-Level Directories
  • Registry Installation: ClawHub & Pre-Built Libraries
  • The Agent Skills Open Specification (agentskills.io)
  • Security & Safety: Treating Skills Like Code Dependencies
  • Best Practices for Writing Effective Skills

Module Content:

Sharing Skills via Git

The simplest approach: commit your .claude/skills/ or .agents/skills/ directory to your repository. Every team member who clones the repo gets the skills automatically. This is the recommended approach for project-specific skills.

For personal skills you want across all projects, place them in the user-level directory:

  • Claude Code: ~/.claude/skills/
  • Codex: ~/.agents/skills/
  • OpenClaw: ~/.openclaw/skills/

Portability tip: If you want a skill to work on both Claude Code and Codex, you can symlink the same skill folder into both .claude/skills/ and .agents/skills/. The SKILL.md format is identical.

The Agent Skills Open Specification

The Agent Skills specification (agentskills.io), originally developed by Anthropic, has become the dominant cross-platform standard. As of early 2026, over 30 agent products have adopted it—including OpenAI Codex, Google Gemini CLI, Microsoft/GitHub Copilot, Cursor, JetBrains Junie, and many more.

The spec defines:

  • Required frontmatter: name and description with specific validation rules
  • Optional frontmatter: license, compatibility, metadata, allowed-tools
  • Folder conventions: scripts/, references/, assets/
  • Naming rules: kebab-case, 1–64 characters, no consecutive hyphens
  • Cross-client path: The .agents/skills/ convention as an interoperability directory that all clients can scan

Security & Safety: Treating Skills Like Code

Skills are privileged instructions with real security implications. When an agent loads a skill, it follows those instructions with the same trust it gives system prompts. A malicious skill can:

  • Exfiltrate data through prompt injection
  • Execute arbitrary code via bundled scripts
  • Exhaust tokens and inflate costs ("Clawdrain" attacks)
  • Bypass tool restrictions by instructing the agent to use terminal commands

Your Security Checklist:

  1. Review before installing: Read the SKILL.md and every bundled script before adding a skill from an external source.
  2. Pin versions: If using a registry, pin to specific versions rather than tracking latest.
  3. Trust boundaries: Don't auto-load project-level skills from freshly cloned repositories without reviewing them first.
  4. Minimize privileges: Use allowed-tools where supported to restrict what the agent can do during skill execution.
  5. Approval gates: Design skills with explicit confirmation steps before destructive actions.
  6. Keep scripts minimal: Bundled scripts should be short, readable, non-interactive, and have no network calls unless necessary.

Best Practices for Writing Effective Skills

Write for Your Agent, Not for Humans: Be imperative: "Run npm test" rather than "The test suite can be executed via npm." Include explicit defaults. Don't offer menus of options—make the decision and let the user override.

Include Negative Triggers: Always define when the skill should not activate. A good "When to use" section has both positive and negative examples.

Keep the Body Under 5,000 Tokens: The entire SKILL.md body loads into context on activation. Move detailed reference material into references/ files.

Test With Eval Prompts: Build a set of test prompts: at least 5–10 that should trigger the skill and 3–5 that should not. Run "with skill" vs. "without skill" baselines.

Version and Iterate: Skills aren't write-once. As your project evolves, update the skill. Treat skill maintenance like code maintenance.

What Learners Say

I was copy-pasting the same deployment instructions every session. After this course, I wrote a single SKILL.md and never looked back. Saved me hours every week.

M
Marcus T.
Full-Stack Developer

The platform comparison module was exactly what I needed. I use both Claude Code and Codex and now I know how to make my skills work on both with symlinks.

R
Rachel K.
DevOps Engineer

The security module should be required reading. I had no idea malicious skills could exfiltrate data through prompt injection. Now I review every skill before installing.

A
Alex P.
Security Analyst

Ready to Master AI Agent Skills?

Stop repeating yourself. Write it once in a SKILL.md and let your AI agent handle the rest.

Start Course Now